Wednesday, August 23, 2017

Kaara(Spicy) Kozhukattai

I thought of sharing this recipe long back. But somehow missed. As Vinayagar Chadhurthi is approaching I don't want to delay it further & wanted to share this recipe of Kaara Kolzhukattai. I was surprised when I heard from my friends & neighbours making Kaara Kozhukattai using rice flour. In my native place mostly they make it only with idly rice. I hope most of you follow the rice flour method. Do try this method for a change. This method is a bit longer. Believe me once you try this method, you'll stick on to this than making with rice flour. Though it comes under snack category, we usually have it for dinner.
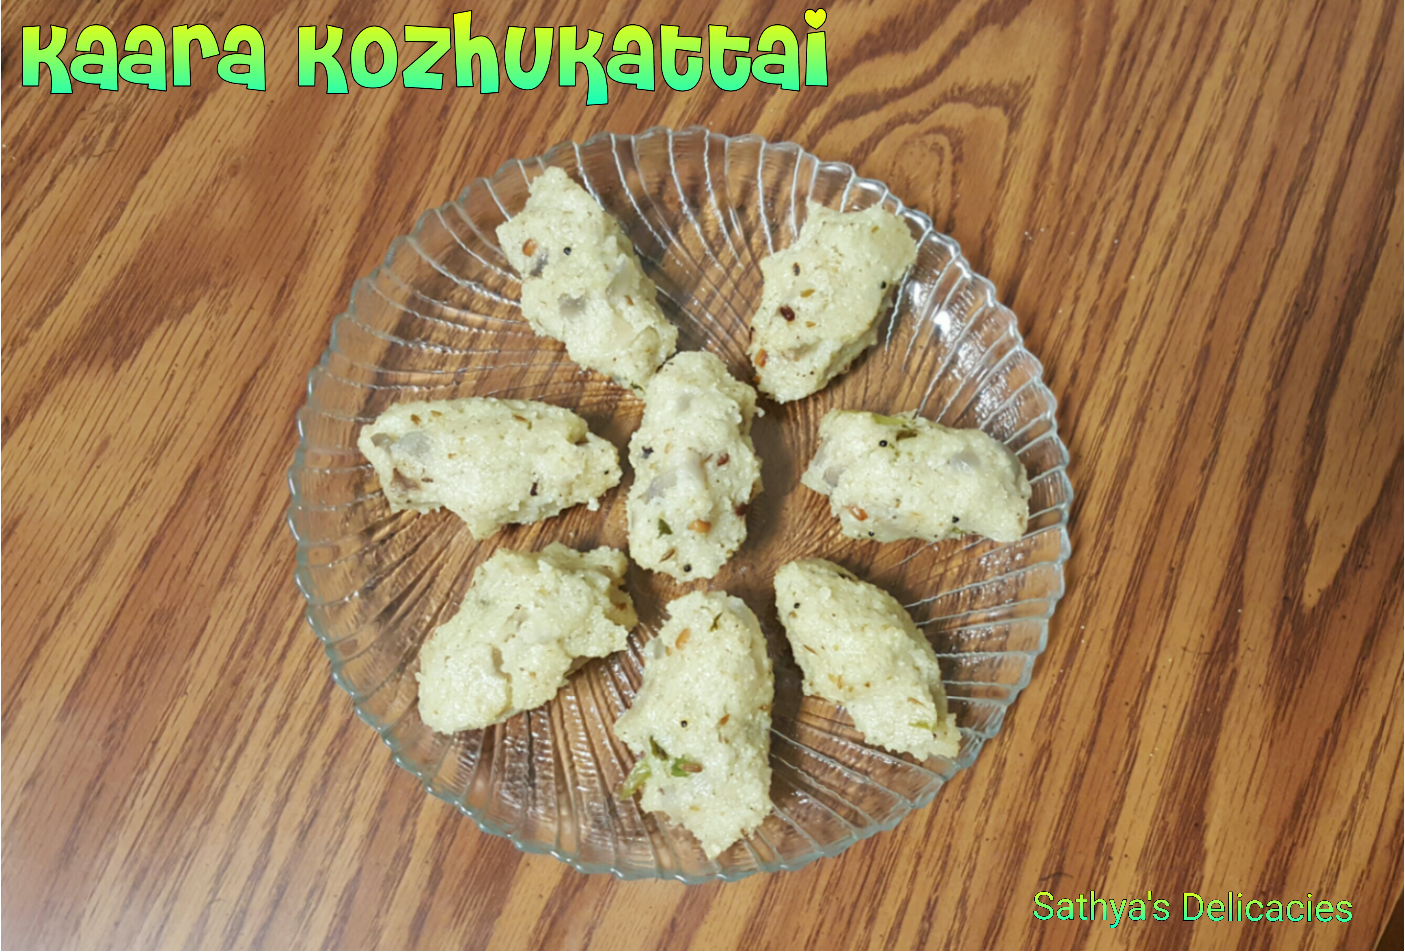

Kaara(Spicy) Kozhukattai Recipe

Soaking Time: 2 hrs | Preparation Time : 20 mins | Cooking Time : 15 mins | Serves : 4
Recipe Category : Snack | Recipe Cuisine : South Indian

Ingredients:

For Grinding:
Idly rice - 2 cups
Shredded Coconut - 3/4 cup 
Cumin seeds(Jeera) - 1.5 tbsp
Curry leaves - a sprig
Salt as needed
Water - 1/2 cup

For Seasoning:
Oil - 1.5 tbsp
Mustard seeds - 1/4 tsp
Channa dal - 1 tsp
Urad dal - 1 tsp
Onion(Medium sized) - 1(finely chopped)
Green chillies - 4 or 5 (Chopped vertically)
Curry leaves - a sprig
Cilantro - chopped finely

Method:

1. Soak the rice for minimum 2 hrs.

2. Grind all the ingredients given under For Grinding in a Mixie jar. Grind coarsely. Keep aside.
 
3. Add oil in a non sticky pan & season it with mustard seeds, channa+urad dals. Once they turn golden brown, add curry leaves, green chillies & chopped onions. Fry them till onion gets cooked & raw smell leaves. Add chopped cilantro & give it a quick stir.

4. Now pour the ground coarse batter to the seasoning and stir well continuously till it becomes thick. It will form a mass. Switch off at this stage & allow it to cool for sometime till it becomes warm.
5. Grease your hands with oil. Take a small portion & make cylindrical shapes pressing it with your finger impression. Repeat the same for the entire mixture.
  6. Arrange it in an idly plate & steam it for 15 mins.

Serve hot.

Points to be noted:
  • Don't grind it smooth. The ground mixture should be coarse to get softer Kozhukattais.
  • You can also grind red chillies with the mixture if you don't want to add green chillies in seasoning. But the taste will differ slightly.

Tuesday, July 4, 2017

About me

Hi Friends

Thank you for visiting my blog!!

To introduce about me..I'm Sathyasuganya, the writer and photographer of this blog. I'm living in USA with my husband Sivakumar and my 4 year old smart kid Sashwat.

As most of the ladies say, I too learned cooking only after my marriage. I just know to prepare tea pre-marriage. My mom is a great cook. I always admire the way she cooks. She cooks so fast and also every time it turns yummy too. But I never showed interest to learn cooking, as I got tasty food everyday. After my marriage one fine day came, where I was left alone in the kitchen to prepare sambar for lunch. I made a total mess, putting chana dal instead of toor dal, also added a full tsp of turmeric powder to get an attractive colour:) After such a terrible 1st experience in cooking, I realized that eating is a necessity but cooking is an art. Then I always used to call my mom and trouble her for each & every step of whatever I cooked.

My husband being a good critic, always gives me the right feedback, which helped me to improve a lot in my cooking. My little one is the sole reason for further improvisation in my cooking. He is a good taste indicator and never eats a food if something in it is lacking or excess. So I used to be very careful in preparing the food to make him eat. From my experience, I felt anything cooked with care, love & affection always adds a new flavor to the food. I always try new recipes whenever I invite some guests. Its weird right?:) But it worked well for me everytime, as I used to be more cautious that nothing should go wrong.

My passion for cooking really started once Sashu started eating solid foods. When I started to search a variety of recipes for him, I came across so many food blogs. I got impressed by the photographs in those blogs and I started exploring them. Also I started to experiment sweets & snacks, as here in US we don't have sweet shops in all places.Though there are some branded canned sweets in Indian shops, I usually wont prefer that. Nothing equals the homemade fresh ones.What say?

I went crazy on taking photographs whenever I prepare some special food, in order to show my mom on Skype. Also I like anything presented in an aesthetic way. But I never ever thought of starting a food blog, until I posted some of my clickings on Facebook. Some of my friends & my hubby motivated me to start a blog & now I'm here into the world of food blogging.

I don't admit myself as an excellent cook. Practice makes anyone perfect. Most of the recipes I post here are borrowed from my mom, referred from some food blogs and friends. Here I only post the successful recipes I have tried. I also apologize for not posting step-by-step pictures, as I have to put a lot of work all by myself right from cooking, arranging and composing a perfect shot before my kid returns from school(or else he'll pesture me for the camera:-) But I will try my level best to give clear instructions on step-by-step procedures.

My other interests are painting, arts & crafts and now food photography.

Hope you all enjoy my blog!!

Your comments & feedback are most welcome.

If you have anything to ask me regarding any of the recipes on the blog, you can mail me at sathyasdelicacies@gmail.com.

Tuesday, May 23, 2017

Strawberry Jam (Homemade)


How can I resist myself from making a recipe with the yummy fresh Strawberries picked straight from the farm?:) It was really a wonderful experience visiting a farm full of beautiful, delicious, ripe Strawberries ready for us to pick. My kid enthusiastically picked lots of berries and I was not sure if I can make use of all those before it gets spoiled. As the shelf life of Strawberry is less, I thought of making some recipe with it other than milkshake & finally came across this homemade Strawberry Jam. Yayyy! It turned out so good beyond my expectation. It is so easy to prepare and a good combo for not only bread, even Chapathis too. Now sharing with you all the recipe of Homemade Strawberry Jam without any preservatives or chemicals.


Recipe Cuisine: Continental | Recipe Category : Condiments
Prep Time: 10 mins | Cook Time : 15 mins | Makes :3/4 cup


Ingredients:

Fresh Strawberries - 30
Sugar - 3/4 cup
Lemon - 1

Method:

1. Remove the green leafy part and wash the Strawberries well.

2. Make puree of it using a blender without adding water.

3. Heat a non sticky pan and transfer the puree to it.


 4. Now add sugar and lemon juice to it and stir well.


5. Continue to stir it in medium heat for 10-15 mins till it becomes thick and glossy and switch off.


6. Allow it to cool and refrigerate in a clean airtight container.

Points to be noted:
  • Don't make it too thick. Switch off once the puree is not watery and it reaches the glossy texture. It becomes even more thick when it cools down.
  • Adjust the amount of sugar based on the tanginess of the berries you use. 
  • You can even add a pinch of salt to enhance the sweetness.
  • It stays good for 2 to 3 weeks if handled properly.


Friday, May 19, 2017

Royal Rose Falooda


Falooda is a rich, cold & creamy dessert/beverage most popular in the Northern parts of India. Though I'm not a big fan of Falooda, just wanna give it a try for my kid this summer when I came across some pictures of it in beautiful layers. The preparation of this dessert is so easy when all the ingredients needed for this recipe are kept handy.

Recipe Cuisine: Indian | Recipe Category : Dessert
Prep Time: 10 mins | Cook Time : 15 mins | Serves : 2

Ingredients: 

Milk - 1 cup
Rose Syrup/essence - 2 tsp
Vermicelli - 1/4 cup
Sabja(Tukmaria)/Chia seeds - 1 tbsp
Rose/Strawberry Jelly - 1/4 cup
Vanilla Icecream - 1 scoop
Chopped nuts - few for garnishing

Method

1. Soak the Sabja(Tukmaria) seeds in a cup of water for 15 mins.

2. Boil 2 cups of water & add the Vermicelli to it & cook till it becomes soft. Drain it & keep aside.

3. Boil milk in medium flame till it becomes little thick. Switch off & allow it to cool.

4. Meanwhile chop the Rose/Strawberry jelly into small pieces. Chop the nuts & keep it ready.

5. Once the milk got cooled, add rose syrup to it & strir well. If your rose syrup has sugar in it don't add sugar. If not or if you add rose essence, add sugar according to your taste.

6. Refrigerate the rose milk for 30 minutes. 

Serving:

1. Take a serving glass and first add a layer of  jelly to it.

2. Add rose syrup/essence above the jelly.

3. Then add a layer of cooked vermicelli.

4. Now add a layer of soaked Sabja/Chia on top of it.

5. Then add the chilled rosemilk till 3/4th level of the serving glass.

6. Now add a scoop of Vanilla Icecream at the top.

7. Garnish it with chopped nuts & jelly.

Serve cold.


Points to be noted:
  • Don't forget to refrigerate the rose milk before serving.
  • Add sugar based on the rose syrup you are using.
  • Icecream of any flavor can be used.
  • You can even garnish with fresh or dry fruits while serving.


Wednesday, May 4, 2016

Kasi / White pumpkin Halwa


Wishing you all a very happy & safe Diwali!! Sweets play a vital role in the celebration of Diwali and its always a pleasure to share it with our friends & neighbours. As Diwali is heading up, most of us have a big question of the sweets we are going to make this Diwali. I thought to share this recipe as it is less time consuming with less effort. Kasi halwa takes priority in most of the South Indian weddings & I always like it for its glossy & melt in mouth texture. Lets get into the preparation of this easy & delicious halwa..

Kasi Halwa Recipe

Preparation Time : 10 mins | Cooking Time : 20 mins | Serves : 2
Category : Sweet | Cuisine : South Indian

Ingredients

White pumpkin (grated) - 1 cup
Sugar - 3/4 cup
Cardamom powder - 1/2 tsp
Ghee - 3 tbsp
Cashews - 7 broken
Edible camphor - a tiny pinch
Food color - a pinch

Method

1. Peel off the skin of the white pumpkin and discard the seeds. Grate the fleshy white part and reserve the juice you get while grating.

2. In a pan heat a tsp of ghee and roast the cashews till golden brown and set aside.

3. In the same pan add a tbsp of ghee and put in the grated pumpkin and saute till the raw smell leaves. Then add the reserved water to it and cover it with a lid till it becomes soft and cooked.

4. Once it gets cooked well, add sugar and mix well. Now add the food color too.

5. Stir it continuosly till it becomes glossy and transparent. Add a tbsp of ghee. It will form a mass and leave the sides of the pan. At this stage add the cardamom, edible camphor, roasted cashews and remaining ghee and give it a quick stir. Switch off the flame and serve warm.

Points to be noted:

  • Add sugar only after the pumpkin is well cooked. If you add before it will never get cooked again and will become hard.
  • Add just a tiny pinch of edible camphor.


Mango Kulfi / Popsicle


Who will say no to Kulfi in this burning hot summer?:-) Making Kulfi at home is one of my longtime wish & finally it came true. Yay!! I made it successfully! I decided to make Mango Kulfi as I got to see both Kulfi mould & ripe mangoes at Walmart. But it was quite tricky to get a clean demoulded Kulfi & a bit challenging to make perfect clicks before it started to melt. I tried my best to click attractive pictures, but not much satisfied though. Trust me, it tasted heavenly.

Kulfi is a popular frozen dairy based creamy dessert widely available in India. It is almost same as icecream in taste & appearance. Kulfi can be made in different flavours. But the more traditional ones are Cream(malai), mango, saffron, cardamom and pistachio. This dessert likely originated in the Mughal Empire.


Mango Kulfi Recipe
  
Preparation Time : 30 mins | Freezing Time : 6-8 hrs | Serves : 8
Recipe Category : Dessert | Recipe Cuisine : Indian

Ingredients

Mango Pulp - 1 cup

Whole Milk - 2.5 cups 
Sugar - 1/4 cup 
Condensed Milk - 1/4 cup 
Cardamom powder - 1/2 tsp
Almonds - 10
Pistachios - 6
Almonds & Pista(Crushed) - 2 tsp for garnishing
Saffron strands - 4

Method 

1. Soak the nuts for atleast an hour before the preparation. Then grind it to a smooth/coarse paste. Add the Saffron strands to a tsp of warm milk and set aside. Prepare mango pulp and keep it ready.

2. Boil milk in a heavy bottomed vessel in medium flame. Then in low flame, till it reduces in volume. Make sure to stir it continuosly to avoid burning of milk at the bottom. Add Sugar, Condensed milk and Saffron milk. Let it boil in low flame for 10 mins.

3. Now add the pasted nuts and cardamom powder to it and allow it to boil till it becomes creamy. Switch off the stove and allow it to cool completely.

4. Once cooled, add mango pulp to it and whisk well with an egg beater or in a hand whisk.

5. Pour it in Kulfi moulds and freeze it for 6 to 8 hours. Once done keep the moulds in running tap water. Carefully pull the lids of the moulds.

Garnish with the crushed nuts & serve it chilled.

Points to be noted:
  • Choose less fibre, ripe mangoes. 
  • Adjust the quantity of sugar based on the sweetness of mango.
  • Stir the milk continuosly to avoid burning odour. 
  • Taking out the moulds without sticking is a bit tricky. Show it in running water just for few seconds or else it will start to melt.
  • No worries if you dont have Kulfi moulds. You can use disposable plastic cups covered with aluminium foil and insert popsicle sticks.


Drumstick leaves Kulambu/Curry


Drumstick greens/leaves are an excellent source of Vitamin A offering several health benefits including maintenance of skin integrity, vision, immunity and mucus membrane repair. A good anti-oxidant too. It is so good for pregnant women & feeding moms as it is rich in iron, calcium & zinc.

My mom used to make this curry frequently with fresh, young, tender leaves, as we had a drumstick tree at my backyard. When I came to USA I missed it a lot as it is one my favorites. But I was so happy & excited to see fresh drumstick leaves at the Indian grocery store a year back. From then I used to buy it frequently & started enjoying this curry. I thought to post this recipe as I heard few people saying what dish can we make out of those leaves. It is a very simple, tasty & less time consuming recipe except for the cleaning part.

Drumstick leaves Kulambu/Curry Recipe

Preparation Time : 10 mins | Cooking Time : 15 mins | Serves : 4
Recipe Category : Gravy | Recipe Cuisine : South Indian

Ingredients

Drumstick leaves - a big bunch

To grind:
Shallots(small onions) - 4
Red chilli - 2
Garlic pods - 1
Coriander seeds - 1tsp
Toor dhal - 2 tsp 
Cumin seeds(jeera) - 1tsp
Coconut(shredded) - 2 tbsp
Curry leaves - a sprig


For seasoning:
Coconut Oil - 2 tsp
Mustard seeds - 1/4 tsp
Curry leaves - a sprig
Shallots - 5

Method

1. Clean the leaves without sticks and wash thoroughly.

2. Pre-cook the leaves with a cup of water for 10 mins till it becomes soft. 

3. Grind all the ingredients given under To Grind.

4. Heat the pan with coconut oil and season it with mustard seeds, curry leaves & shallots.

5. Then add the ground paste to the seasoning.

6. Add the pre-cooked leaves & required salt.

7. Cook in medium flame for 10-15 mins & switch off the flame.

Serve it with hot steamed rice or dosas.

Points to be noted:
  • Select a fresh bunch with young tender leaves.
  • Do not overcook the leaves or gravy as it will spoil the taste.