Saturday, March 10, 2018

Chicken Briyani (Thalapakatti Style)


After experimenting a variety of methods preparing Briyani, I just sticked on to this method as it tasted heavenly whenever I made this way. The main flavour of this Briyani comes from the freshly ground homemade Briyani masala & also the Seeraga samba rice we use. I was longing for a longtime to try it with this rice to get the authentic flavor of Dindigul Thalapakatti Briyani & finally found it in an Indian grocery store. From then, Basmati is my 2nd choice when it comes to Briyani:) What are you waiting for? Try out this method & make your Sundays filled with aroma!😋

Chicken Briyani (Thalapakatti Style) Recipe

Preparation Time : 15 mins | Cooking Time : 20 mins | Serves : 3
Category: Main | Cuisine: South Indian

Ingredients:

Seeraga samba rice - 2 cups
Chicken - 1/2 kg (cleaned)
Onion - 1 large 

Tomato - 1
Green Chillies - 2 slit
Ginger Garlic Paste - 3 tbsp
Chilli Powder - 1 tsp
Coriander powder - 1 tsp
Garam masala powder - 1/2 tsp
Coriander Leaves (Cilantro) - 1/2 cup chopped
Mint Leaves - 1/4 cup chopped

Yogurt - 1/4 cup 
Water - 2.5 cups
Coconut milk - 1 cup
Lemon juice - 2 tsp
Ghee - 2 tbsp
Oil - 3 tbsp
Salt to taste
 
For the Marinade:
Chicken - 1/2 kg (cleaned)
Thick Yogurt (curd) - 1/4 cup
Chilli powder - 1/4 tsp
Turmeric powder - 1/4 tsp
 
For the Briyani Masala Powder:
Cloves -5
Cinnamon Stick - 2 inch piece 
Fennel Seeds (Sombu) - 1.5 tbsp
Coriander seeds - 1/2 tbsp
Cardamom - 4
Star Anise - 1


To temper:
Bay leaves - 2 
Cloves - 2
Cinnamon stick - 1 inch piece
Cardamom - 2
Star anise - 1 
 
Method
1. Wash and soak the rice for 25 mins. 
Wash & clean the chicken. Marinade it with the ingredients listed under For the Marinade.
 
2. Grind all the items given under For the Briyani Masala powder and set aside.


3. Now heat the oil + 1 tbsp ghee and temper it with bay leaves, cloves, cinnamon sticks, star anise & cardamom. Add the onions, green chillies and saute for few mins till it becomes slight golden brown.


5. Add the ginger garlic paste and saute till the raw smell leaves. Then add chopped tomatoes till it becomes mushy.
 Add in chilli powder, coriander powder, garam masala powder and the ground Briyani masala powder and saute it for 2 mins. 


6.  Then add the coriander, mint leaves & yogurt & saute it till the oil seperates from the masala.

 7. In a pan, add a tsp of ghee and fry the soaked and drained rice for 2 mins carefully without breaking the rice. 


8.  Transfer the masala & marinaded chicken to the pressure cooker. Blend it well & stir it for a min to get the chicken blended well with the masala.


9. Now add 2.5 cups of water + 1 cup of coconut milk, salt, chopped coriander & mint leaves and bring it to a boil.


10. Now add rice to the boil & finally add the lemon juice.

11. Cover the cooker with the lid. For those who are using gas/flame stove, cook it in medium flame for 7 mins and reduce the flame to completely low for 5 mins & switch off. Those who are using coil stove, cook in medium for 8 mins & switch off . Let it be on the coil. Allow the steam to be released all by itself without disturbing it. Open the cooker once the pressure is fully released.

 Add a tbsp of ghee and fluff the rice with a fork or with the backside of a flat spatula.


Serve it hot with onion or cucumber raita.


Points to be noted
  • You can also use basmati rice if you dont have Seeraga Samba.
  • I always use the freshly ground ginger garlic paste, as it adds more flavor than the store bought ones. Also grinding it with curd reduces its strong aroma.
  • While sauting the onions, always add little salt to it so that it gets cooked fast.
  • Never try to release the pressure until it gets released by itself.
  • Frying the rice in ghee & adding lemon juice avoids stickiness of the rice.
  • If you want more mint flavor add more mint leaves. As we like a mild flavor, I added only little.

Friday, January 12, 2018

Sakkarai Pongal (Sweet Pongal)


Hope everyone's festive mode is on to celebrate the upcoming Pongal festival. Wishing you all a very Happy Pongal!!

Sakkarai Pongal is made in different ways using a brass pot in a firewood oven which is the traditional method or in a pressure cooker with gas stove. In my native Pollachi, most people use the traditional method to make Pongal. They used to rinse the raw rice and pour that rinsed water in Pongal Paanai. Rice will be added only after it becomes frothy & falls down. The cooked rice will be served along with Mochai Kulambu, Dal, Veggies, Vadai & Payasam. Celebrating Pongal with the cooker made Pongal no where matches the Pongal celebrated in a traditional way in the villages. Cherishing those memories, I'm posting the recipe of Sakkarai pongal in the pressure cooker method.    

Sakkarai Pongal Recipe:

Recipe Cuisine: South Indian | Recipe Category : Sweet 
Cook Time : 30-40 mins | Serves : 4

Ingredients: 

Raw rice (or Long grained rice) - 1 cup
Moong dhal - 4 Tbsp
Jaggery - 1 cup
Water - 5 cups
Milk -1/2 cup
Cardamom powder - 1/4 tsp
Edible camphor (optional) - a pinch
Cashews & Raisins - few
Ghee - 1/4 cup

Method:

1. Soak the rice for 15 minutes. 

2. Add a tsp of ghee in the cooker. Fry the cashews & raisins till golden brown & set aside. With the remaining ghee in the cooker, fry the moong dal till a nice aroma comes.

3. Add 5 cups of water to the cooker and add the soaked rice. Let it cook along with the dal till 5 or 6 whistles.

4. Meanwhile make the jaggery syrup. Add little water to the jaggery just to get soaked and heat it till the jaggery gets dissolved. Switch off. No need to check the string consistency.

5. Once the pressure gets released completely and the rice & dal are cooked well, mash it & add the jaggery syrup and milk to it. Stir it for 5 to 10 minutes till you get the semi solid Pongal consistency. 

6. Now add the ghee, cardamom powder, a tiny pinch of edible camphor, roasted cashews & raisins. Stir those along with the pongal for 2 minutes and switch off the flame. 


Points to be noted:
  • If the pongal is too watery, stir it till a semi solid consistency is reached. 
  • Switch off when it is in a semi solid state. Or it will become hard & dry after sometime. It should be mushy & in a melt in mouth texture.
  • Add ghee generously as it gives a rich & divine flavor to the Pongal. 
  • Adding edible camphor gives the taste of the Pongal prasadam we get in temples:) but it is optional. If you decide to add it, only add a tiny pinch or it will spoil the taste of the Pongal. 
  • Add the jaggery syrup only when the rice & dal are well cooked.  
  • Using long grained rice instead of the regular sona masoori makes the pongal softer & fresh even after hours.


Wednesday, December 20, 2017

Plum Cake


Plum cake is the one that comes to my mind after Santa during Christmas season😃 It was in my wish list for a long time. I made sure to bake it this year before Christmas & post it in my blog. But I was not much confident about the outcome as I rarely bake cakes & also its my first try on Plum Cake. And yes..finally I made a super soft & aromatic Plum cake👍 Felt nostalgic as it tasted similar to the one which my Dad used to get me from a famous bakery in my hometown😃 I always had a doubt why its called Plum cake when no plums are added to it or rarely can see dried plums in it. Then I came to know, initially Plum cakes made in European countries were prepared with fresh plums & hence the name. Then it changed over time & a wide range of cakes made with dried fruits & nuts are often referred as Plum cake or Fruit cake. In traditional method they used to soak the dried fruits & nuts in Rum for a month before adding to the cake mix. But in this recipe I soaked those in Orange & grape juices replacing Rum. Its a bit long process, but worth the taste😋
Try this recipe & celebrate Christmas with a yummy Plum cake🎂 Wishing you all a Merry Christmas🎄🎅 & a Happy New year💥

🎂Plum Cake Recipe🎂

Preparation Time : 15-20 mins | Soaking Time: 1day | Baking Time : 40-50 mins | Makes:1.65 lb
Category : Dessert | Cuisine : Indian

Ingredients   

All purpose flour/Maida - 2 cups
Brown Sugar -2 cups
Unsalted butter(softened) - 1 cup
Eggs - 5
Baking soda - 1/2 tsp
Baking powder - 1 tsp
Salt - a pinch
Vanilla extract - 1 tbsp

For Soaking:
Orange juice - 1 cup
Grape juice - 1/2 cup
Chopped nuts(Almonds,Cashews,Walnuts,Hazel nuts,Pistachios) - 1 cup 
Raisins(Black) - 3/4 cup
Tutty fruity+cherries - 1 cup
Orange Zest (top layer of orange peel)) - 1 tbsp
 
For Sugar caramelization:
Sugar - 1/2 cup
Water - 1/4 cup
Boiling water - 1/4 cup

For Spice Mix:
Cinnamon - 2 inch piece
Cloves - 5
Cardamom -2

Method:

1. The first step is soaking. Chop the nuts you needed to add. Put the nuts in a mixing bowl along with raisins, Tutty Fruity, Cherries & Orange zest & mix well.


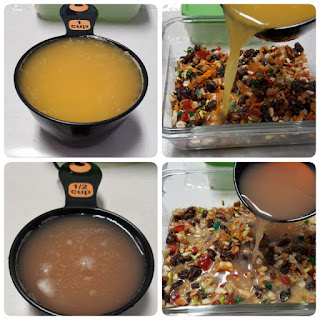
2. Prepare a cup of fresh Orange juice & 1/2 a cup of grape juice. Add those juices to the above mixture in the bowl.


3. Allow overnight or 1 day to get those dryfruits & nuts to get soaked well & absorb those juices. I allowed to soak it for a day.

A day after..look how the fruits & nuts absorbed the juice.


4. Now comes the Caramelization part. Add 1/2 cup of sugar in a heavy bottomed vessel & a little water, say 1/4 cup or even less. Allow it to boil till all the sugar got dissolved & a thick syrup consistency is reached. It should be brown. Turn off the stove. 

While that process is going on keep ready 1/4 cup of  boiling water. Now add the boiling water to the thick, brown sugar syrup. The syrup will harden a bit. Turn on the heat again & heat till the sugar crystals dissolve. Once all the sugar crystals are dissolved & you get a smooth syrup (just like honey consistency) turn off the heat. Set aside & let it cool while you proceed with the cake preparation.


5. Add 1/2 cup of sugar, cloves, cinnamon stick & cardamom in a small mixer jar/blender & make it a fine powder.

6. Sieve 2 cups of all purpose flour/maida & set aside. Add softened butter in a mixing bowl & blend well with a hand whisk or an electric whisk.Then add 5 eggs & blend well. Now add caramalized sugar syrup, powdered sugar & spice mix & blend.
To the blended mixture add the remaining 1 cup of sugar, a tbsp of Vanilla extract, all purpose flour, a pinch of salt, baking soda & baking salt and blend well for 2 mins.

7. Finally add the soaked nuts & fruits mixture along with the juice to the above blended mixture. Blend those well. The mixture should be neither thick nor watery. It should be in the consistency shown in the pic. 
   Coat the cake tin/pan with butter & dust it with little flour. Or you can place a butter paper if u have.


8. Pour the blended cake mix to the coated cake pan evenly. 

9. Preheat the conventional oven to 350 F. Bake it for 40-50 mins. If you are baking in 10 inch pan it may take 70 mins. Check after 40 mins inserting a tooth pick. If it comes out clean without sticking, your cake is done & ready to take it out from the oven.

10. Allow it to cool completely & then make pieces.

Now the yummy Plum cake is ready to eat!🍰

Points to be noted:
  • You can coat the soaked dry fruits & nuts with 3 tbsp of flour before blending so that it wont get deposited at the bottom while baking. 
  • If you want to make this cake instantly without soaking for a day, you can boil those dried fruits, nuts & juices altogether for 5 to 6 mins in medium flame. Allow to cool completely & then add it to the cake mix batter.
  • Don't skip adding Orange zest. It adds more flavor to the cake. You can add less cloves if u want less spice flavor. I added more to supress the egg smell.


Sunday, October 15, 2017

Ghee Mysorepak

Mysorepak is one of the traditional sweets prepared during Deepavali in most of the houses. I tried it few years back but not satisfied with its texture. I always wonder the melt in mouth texture of Krishna Sweets Mysorepak. It was a nightmare & I never thought I'll be able to make this melt in mouth magic just by following an extra step of mixing besan flour & ghee. I gave it a try again.Yes..finally I got it:) Mysorepak can be made easily with less ingredients & its also less time consuming. Enjoy this Deepavali with this melt in mouth Mysorepak!!


Ghee Mysorepak Recipe

Preparation Time : 10 mins | Cooking Time : 25 mins | Makes : 25 small pieces (approx)
Category : Sweet | Cuisine : South Indian

Ingredients

Besan Flour - 1 cup
Sugar - 1 cup
Water 1/4 cup
Ghee - 1.5 cup (1cup for mixing flour + 1/2 cup minus 2 tbsp for stirring)

Method

 1. In a pan add a tsp of  ghee and add a cup of besan flour to it & roast till a nice aroma comes, say for 5 mins. Then sieve the flour so that no lumps are there. Grease a plate with little ghee & keep aside.

2. In a bowl add 1 cup of ghee. Now add the sieved flour to it gradually stirring it without forming any lumps. Keep aside. Now add a cup of sugar in a non-sticky pan. Add 1/4 cup of water to it.


3.  Allow it to boil in medium flame till a single string consistency is reached. Reduce the flame to low. Now add the besan+ghee mixture to the sugar syrup and stir it continuously. Add the remaining 1/2 cup (minus 2 tbsp) ghee in intervals little by little while stirring.


4. Keep stirring till the mixture is not getting sticked to the pan. At a stage it will form a mass without sticking & bright yellow bubbles will appear. This is the right stage where you have to switch off & pour it in the greased plate. It will flow by itself beautifully as in the picture below. No need to flatten. Allow it to cool for sometime. When its warm cut it into squares or diamonds as you wish.


Store it in a clean container & enjoy your Mysorepaks.


Points to be noted:

* Besan flour should be roasted to avoid the raw smell. Don't skip it.

* There are 2 stages where you need to be very careful. One is checking the single string consistency of sugar syrup. The other one is to switch off & pour it when the correct consistency is reached. If not the Mysorepak will not be soft.

* Before adding the remaining 1/2 cup ghee while stirring remove 2 tbsp ghee if you dont want ghee oozing out. When I made Mysorepak first time I added 1/2 cup ghee fully. After pouring it in the plate some ghee oozed out though it didnt affect the taste or texture of Mysorepak. To avoid ghee oozing out this time I removed 2 tbsp from 1/2 cup.

* The whole stirring process should be in low flame. Use non-sticky pan for best results.


Wednesday, October 11, 2017

Ola / Ribbon Pakoda

As Diwali is round the corner everyone will be busy in shopping & the other important thing going in our mind will be to decide the Sweet & Savory we are going to prepare this Diwali. The best and easy option for Savory is Ola/Ribbon Pakoda. Its a good tea time snack too. Ola Pakoda can be made in two ways. We can soak the idly rice and grind it along with the other ingredients. The other method is using rice flour/Idiappam flour, grinding the ingredients separately and adding to it. Here I gave the easy method with rice flour. In this recipe we are not going to add besan flour. Instead I'm going to add roasted gram flour which makes the Pakoda more crispy. Lets get into the recipe..


Ola Pakoda Recipe

Preparation Time : 10 mins | Cooking Time : 25 mins | Makes : 4 cups
Recipe Category : Snack | Recipe Cuisine : South Indian

Ingredients

Rice flour/Idiappam flour - 1 cup
Roasted bengal gram(Pottukadali) flour -1/4 cup
Butter - 1 tbsp
Sesame seeds(White) - 3/4 tsp
Salt as needed
Hing/Asafoetida -1/4 tsp
Oil - for frying

For grinding:
Dry red chillies -2
Garlic - 1 or 2 pods
Curry leaves - few
Jeera - 1/2 tsp

Method

1. Grind the roasted gram dal into fine powder and sieve it.

2. In a bowl add rice flour, roasted gram dal flour, melted butter, Sesame seeds, Hing & salt. Keep aside.
 

3. Now grind the ingredients given under For Grinding into a fine paste adding little water. Add it to the above mixture & mix well so that it all gets blended.


4. Add water to it little by little till you get a smooth dough consistency.


5. Heat the oil. Fill the dough in the Murukku press. Use Ola pakoda plate.

6. Press the dough in a circular motion in the heated oil. When one side is cooked well, flip to the other side.(Ssh sound & the bubbles will reduce once it gets cooked). Continue the same with other batches till all your dough is over.


7. Drain it in tissue paper & allow it to cool completely. Store it in an airtight container.

Points to be noted

* You have to grind the red chilli paste finely so that the seeds will not get stuck in the hole while pressing. You can even replace red chillies with a tsp of red chilli powder. Once I used green chillies. It tasted good too.

* Oil should be in a perfect temperature. Don't over heat. It will turn brown. If not enough heated the dough will split. So be careful in heating. If you drop a pinch of dough in oil it should rise immediately. Its the correct temperature.

* If you add more butter the pakodas will get separated in oil.


Wednesday, August 23, 2017

Kaara(Spicy) Kozhukattai

I thought of sharing this recipe long back. But somehow missed. As Vinayagar Chadhurthi is approaching I don't want to delay it further & wanted to share this recipe of Kaara Kolzhukattai. I was surprised when I heard from my friends & neighbours making Kaara Kozhukattai using rice flour. In my native place mostly they make it only with idly rice. I hope most of you follow the rice flour method. Do try this method for a change. This method is a bit longer. Believe me once you try this method, you'll stick on to this than making with rice flour. Though it comes under snack category, we usually have it for dinner.


Kaara(Spicy) Kozhukattai Recipe

Soaking Time: 2 hrs | Preparation Time : 20 mins | Cooking Time : 15 mins | Serves : 4
Recipe Category : Snack | Recipe Cuisine : South Indian

Ingredients:

For Grinding:
Idly rice - 2 cups
Shredded Coconut - 3/4 cup 
Cumin seeds(Jeera) - 1.5 tbsp
Curry leaves - a sprig
Salt as needed
Water - 1/2 cup

For Seasoning:
Oil - 1.5 tbsp
Mustard seeds - 1/4 tsp
Channa dal - 1 tsp
Urad dal - 1 tsp
Onion(Medium sized) - 1(finely chopped)
Green chillies - 4 or 5 (Chopped vertically)
Curry leaves - a sprig
Cilantro - chopped finely

Method:

1. Soak the rice for minimum 2 hrs.

2. Grind all the ingredients given under For Grinding in a Mixie jar. Grind coarsely. Keep aside.
 
3. Add oil in a non sticky pan & season it with mustard seeds, channa+urad dals. Once they turn golden brown, add curry leaves, green chillies & chopped onions. Fry them till onion gets cooked & raw smell leaves. Add chopped cilantro & give it a quick stir.

4. Now pour the ground coarse batter to the seasoning and stir well continuously till it becomes thick. It will form a mass. Switch off at this stage & allow it to cool for sometime till it becomes warm.
5. Grease your hands with oil. Take a small portion & make cylindrical shapes pressing it with your finger impression. Repeat the same for the entire mixture.
  6. Arrange it in an idly plate & steam it for 15 mins.

Serve hot.

Points to be noted:
  • Don't grind it smooth. The ground mixture should be coarse to get softer Kozhukattais.
  • You can also grind red chillies with the mixture if you don't want to add green chillies in seasoning. But the taste will differ slightly.